
Good morning you wonderful lot! Hope everything is good with everyone 👍🏼. Wow, these past two weeks have been full on, I don’t think we’ve actually had one day of being able to rest it has been that hectic 🤪, to start with, both me and my mum had an appointment at the Doctors the day after my last post went out – my mums were regarding some test results she’d been waiting for, and mine was to get my chest checked as I’ve been having trouble breathing 😮💨 and wanted to see if I’m asthmatic, well the Dr heard my chest and put me on a course of antibiotics as it sounded very wheezy (possibly due to a chest infection), she said if after 5 days it’s still no better, I’m to go back for further testing, which I ended up having to do as it actually got worse within that time, the nurse (the 2nd time) ordered me a chest X-ray to check everything out as it still sounded wheezy and not right (which I had the following morning) if that comes back clear, there’ll have to be even further testing. So now it’s just a waiting game ⏳. We visited my sister on the Sunday which was so nice and very much needed! My little nephews absolutely dominated our time as all they wanted to do was play outside but I wouldn’t have wanted it any other way 😃 then last week we just had back-to-back appointments at the Drs and I also had the added benefit of having the dentist 🦷, which If I keep doing what I’m doing, I should be starting my treatment at my next appointment hopefully🤞🏼as they took some dental x-rays and clinical examinations of my teeth which was a little painful as at one point I had 3 instruments in my mouth to make it stretch so they could get the full effect for my treatment plan for my braces. Anyway, shall we move on to today’s post…
Taking great photographs of food is a hard-earned skill—after all, that’s why some people are lucky enough to get paid for it. But it’s also a lot easier to hone these days, no matter who you are; even a smartphone can yield gorgeous, high-quality images.
Sure, professional cameras and lenses—provided you know how to use them—can make taking a great photo easier, but they’re not necessary to the process. Just think of all the amazing Instagram feeds out there. No fancy camera or expensive equipment separates magazine-worthy photos from their less impressive counterparts. It’s an understanding of what it takes to compose an appealing image and the confidence to execute your vision. A great photograph is never a fluke—you may not know why it’s special or how you made it that way, but the fact remains that certain fundamentals still came together to make it happen. Details like composition, lighting, and styling, apply regardless of whether you’re using a digital single-lens reflex camera (DSLR), a simple point-and-shoot, or an iPhone.

There’s a popular saying among chefs claiming that “you eat with your eyes first.” Since our sight is the first sensory criteria we use when making decisions about the foods we eat, the visual appeal of the dish plays a huge role in whether want to eat it or not. This is why we tend to unconsciously gravitate towards colorful, carefully plated meals and why food photography is one of the most popular genres across social media. There’s a popular saying among chefs claiming that “you eat with your eyes first.” Since our sight is the first sensory criteria we use when making decisions about the foods we eat, the visual appeal of the dish plays a huge role in whether want to eat it or not. This is why we tend to unconsciously gravitate towards colorful, carefully plated meals and why food photography is one of the most popular genres across social media.
Whether you’re a seasoned photographer or a budding newcomer looking to expand the horizons of your photography website, these food photography tips will make mastering this genre a piece of cake
Write a Brief
If your goal is to become a professional photographer, you’ll need to get familiar with writing detailed briefs. While they’re most commonly used when working with clients, you can highly benefit from integrating them into your personal projects’ workflow. This document should include key details such as your target audience, goal of the project, tone of voice, and publishing platforms. It’s also recommended to sketch out a few image ideas that capture your goals for the photoshoot. This will help you bring to life the images that you envisioned and make the most of your shooting time. If you’re planning to reach out to brands for potential partnerships or sell stock photos, spend some time researching common traits in images used for this purpose, and write down some notes to base your sketches and on-set decisions on.
Choose The Right Gear
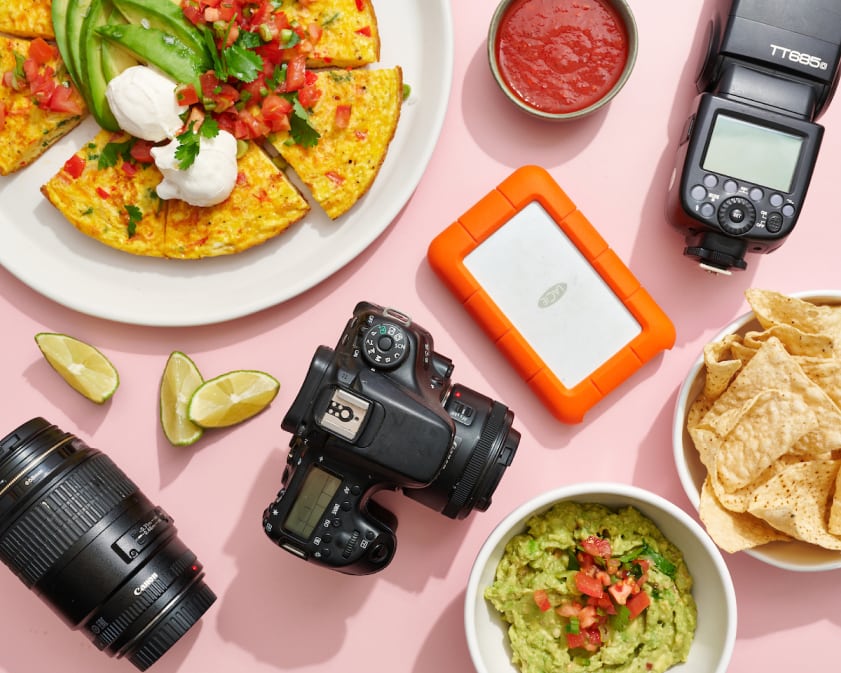
The first question that might come to mind when getting started on a new photography discipline, is the type of camera that you will need. If that’s something you were worrying about, you’ll be happy to hear that pretty much any device will do. This is because you’ll be working with a still subject that you can easily manage at will, and most likely will be shooting in an environment with controlled lighting. All you need is to ensure that you master all camera settings to capture exactly what you had in mind. If your device of choice allows for interchangeable lenses, get your hands on a good prime lens. This is one of the most valued types of camera lenses, as they tend to be much faster and produce higher-quality results. Plus, as mentioned above, you’ll be in full control of the scene and therefore won’t need zoom capabilities.
Invest In A Good Tripod
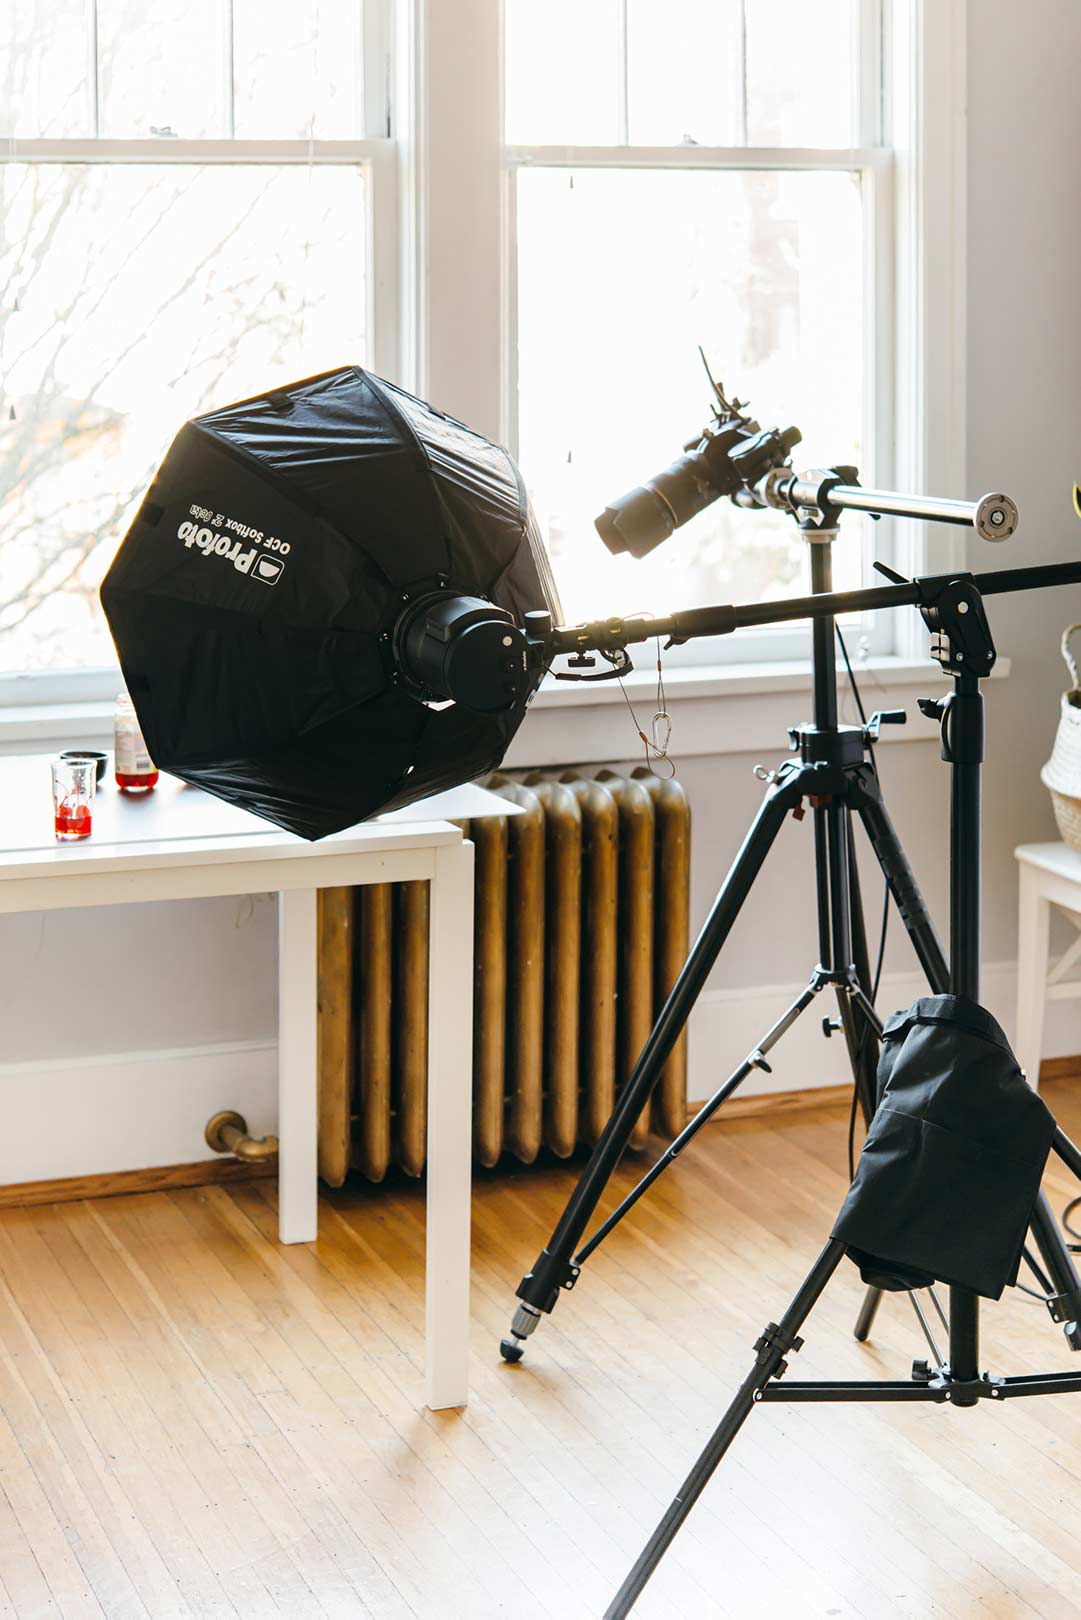
Of all camera accessories out there, a tripod might just be the most popular across nearly all photography genres. Not only do they help you avoid unwanted camera shake on your images, but also help you take a step back and revise your compositions before you press the shutter. Plus, they open the doors to accomplishing creative photography ideas that would be impossible to capture otherwise.
Experiment With Different Heights/Angles

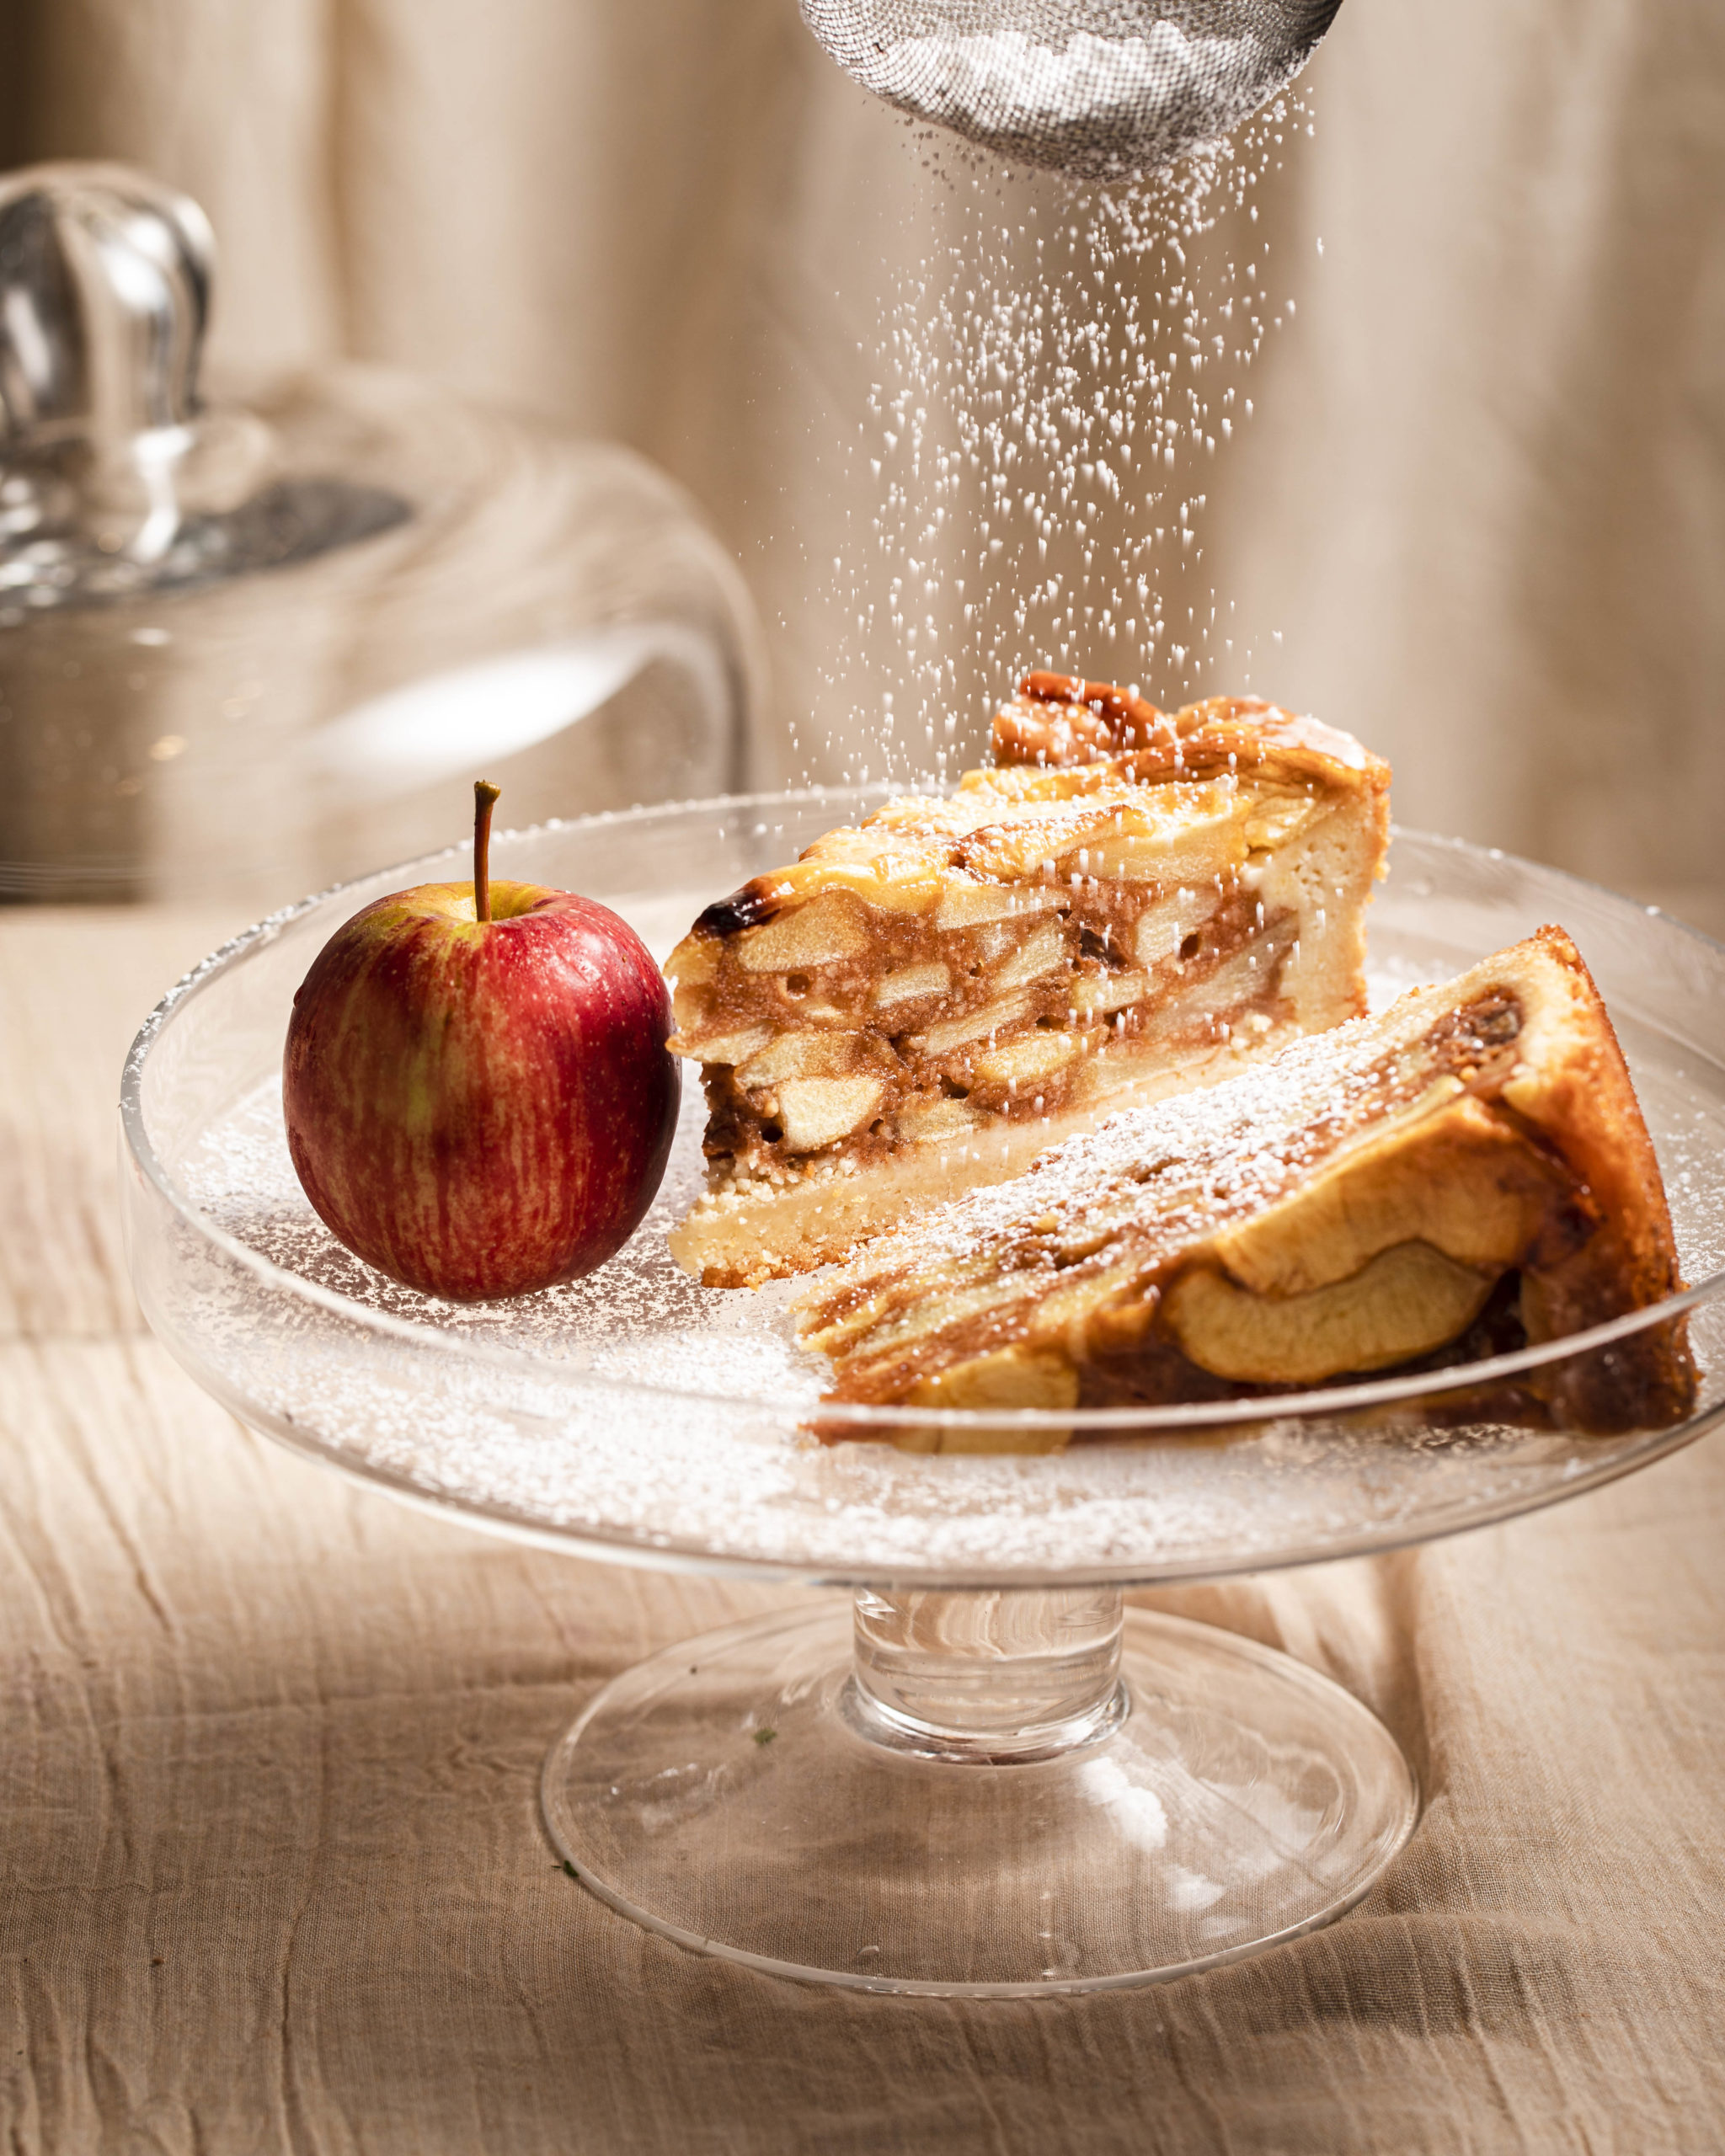
Experiment with height and create different levels. Use a cutting board to raise up some of your scenes. Place something on a cake stand or use glasses at various heights.
You don’t even have to go higher, placing things on a wrinkled kitchen towel creates texture and breaks things up by creating visual differences or layers. Adding height can create a natural frame you can work off, especially if shooting straight on or at different angles.
Search For Natural Lighting

When it comes to illuminating a food photography scene, natural light is generally the preferred choice. This doesn’t mean you should do all your photoshoots outdoors, but rather that you should always strive to get natural, soft lighting. For best results, placing your composition near a large window and shooting during the photography golden hour or an overcast day is recommended to avoid harsh shadows.
Of course, you can recreate this atmosphere in a studio using artificial light with the right equipment and skills. If you choose to take this path, start with one main light and use reflectors to soften the shadows and illuminate the frame, mimicking the effect of the sun shining through a window.
Exposure Triangle
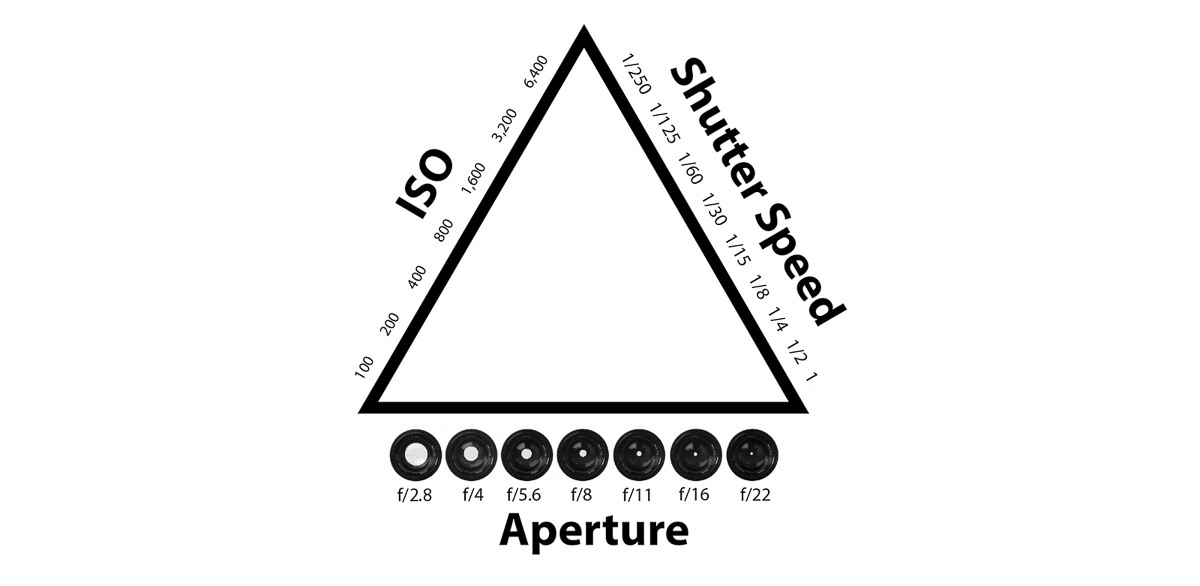

For any given photo, there is only one truly correct level of exposure. But because the exposure triangle has three sides, there are hundreds of potential combinations of aperture, shutter speed, and ISO that you can use to achieve that exposure. If you have achieved the correct exposure for a given set of lighting conditions, and you then change one element of the triangle, you will need to adjust one or both of the other elements to maintain the correct exposure for your shot.
1. Aperture
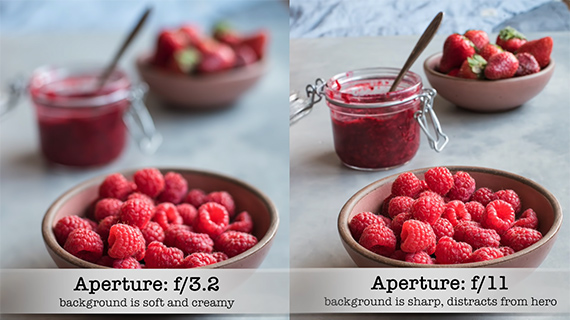
Aperture refers to the opening in the lens that allows light to pass through. It is measured in f-stops, with each ‘stop’ referring to the halving or doubling of the amount of light passing through, relative to the next stop up or down in the scale. The tricky part is that the lower the f-stop, the wider the aperture! But once you understand that, the concept is simple. A wider aperture (low f-stop) lets in more light, while a narrow aperture (high f-stop) lets in less.
2. Shutter Speed
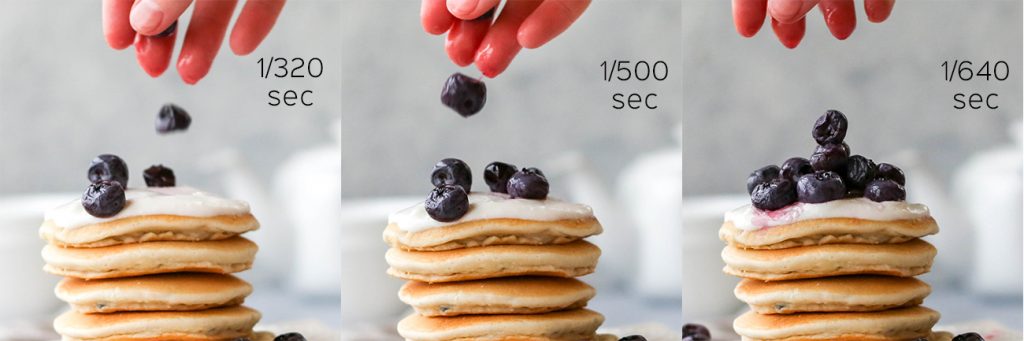
Shutter speed refers to the length of time your camera’s shutter stays open when you take a photo. It is measured in seconds or fractions of a second. A fast shutter speed gives a short exposure, making even moving objects appear frozen. A slow shutter speed will give a long exposure, often creating a blur effect.
3. ISO

ISO measures the camera’s sensitivity to light. A low ISO setting (such as 100) means the camera is less sensitive to light, while a high ISO setting (such as 1600) means the camera is more sensitive to light.
Use Reflectors
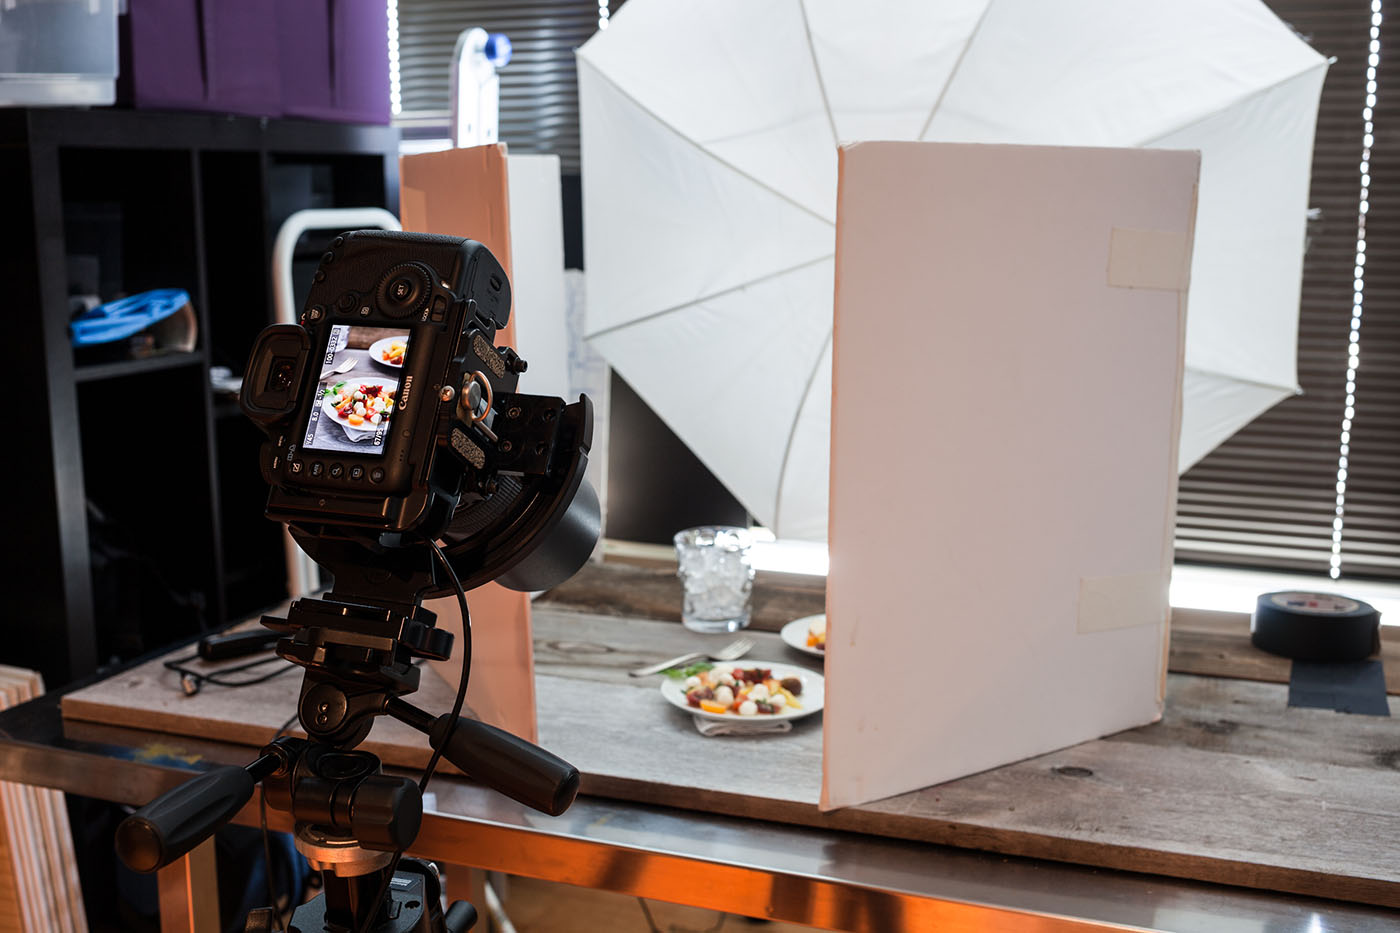
Matte black cardboard folded in half and carefully placed around your shot can create dark shadows or absorb excess light, whereas white cardboard reflected back onto a dark area will reduce unwanted shadowing and help to create highlights.
For more extreme highlights, reflective and shiny surfaces, such as aluminum, can create great effects similar to flash photography without creating unexpected shadows and flattening your image.
A Striking Composition
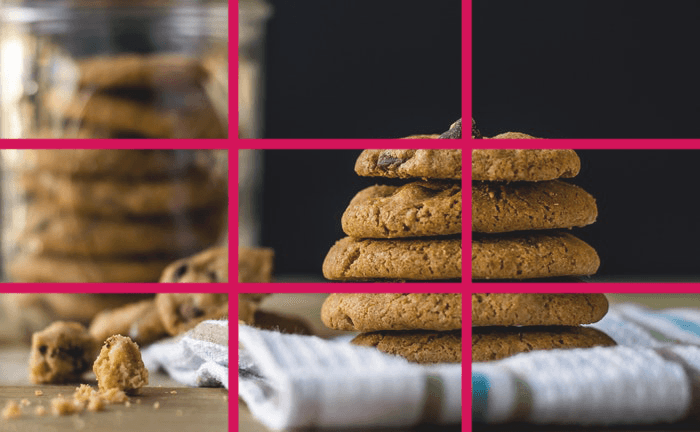
Composition is basically an umbrella term for the arrangement of stuff in your photograph. In a well-composed photograph, you can immediately tell what the primary subject is, whether it’s a person, a plate, or a single sprinkle on an ice cream cone. In other words, composition is second only to lighting when it comes to taking a good photograph. One helpful tool, especially when you’re starting out, is the rule of thirds. It’s a simple but useful concept, though we like to think of it as a suggestion more than an actual rule. It works like this: Imagine your frame is divided into a nine-part grid (like sudoku). The rule of thirds says that your main subject—a plate, a slice of cake, an olive—should be placed either along those lines or at their intersections
Don’t be afraid to rearrange the pieces of food on your plate or mix in non-edible elements. Think of each meal as a canvas ready to be arranged, and use the different photography composition rules to guide the viewer’s eyes across both the frame and the plate. Ideally, you should take some time before the shoot to experiment with how the food you’ll be shooting reacts to different environments. For example, certain foods change color, expand, or enlarge when in contact with heat or cold. Knowing this in advance will not only help you avoid mistakes but also give you the chance to come up with ideas to utilize the circumstances.
Work With A Food Stylist

They say that to be the best you must surround yourself with the best. When it comes to building a photography career, this means you should collaborate with talented professionals from other fields who will help you take each image to the next level. For example, if you were a fashion photographer, you’d try to find a professional stylist and make-up artist to work with, instead of attempting to juggle all roles at once.
The equivalent of that in food photography is having a photographer who cooks, serves, and takes the pictures. While that might work to some extent, it will make the job much harder and will rarely meet the standards of collaborative efforts. Partnering with a food stylist will help you ensure that the composition of the dish is the absolute best to transmit your creative idea. This includes anything from textures and colors to props and tableware.
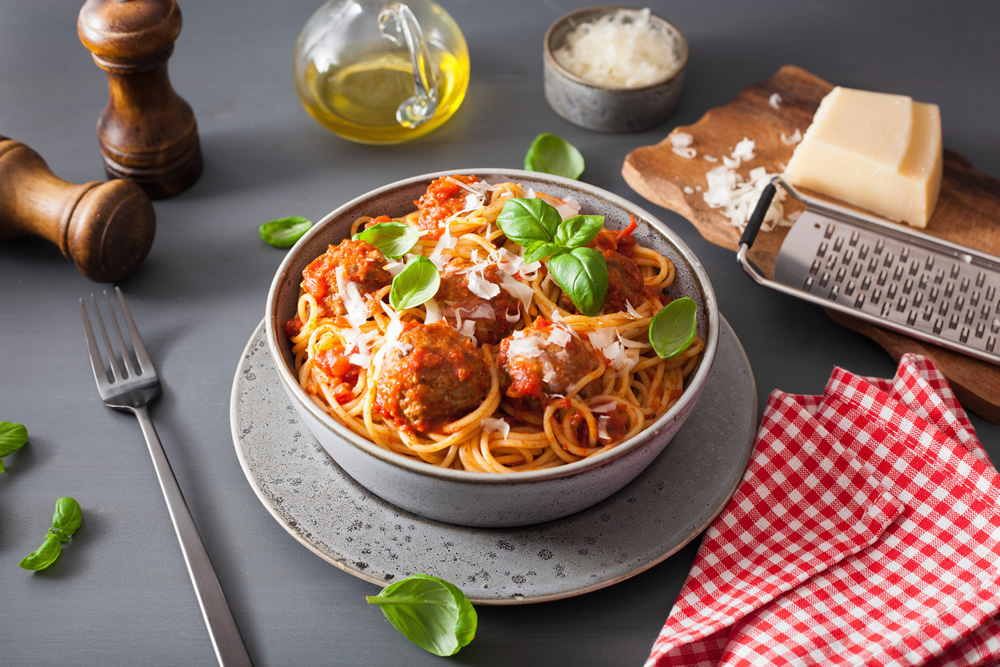
Use Props

Props are friends, and not necessarily always food. Including accessories in your compositions can help you add a personal touch to the image and strengthen its visual appeal.
The props used in food photography tend to be related to each dish’s ingredients, origin, or cooking. However, integrating other accessories such as flowers, books, or fabrics can also strengthen the overall look of the image.
Regardless of the type of elements that you choose to add to the composition, make sure that they serve only to support the main subject. That is, they should not be more eye-catching than the dish you’re photographing, nor clutter the frame excessively.
Pay Attention To Colour
Colour goes hand in hand with light in terms of importance in food photography. In fact, this might be the only type of photography where black and white images are unheard of. After all, can you imagine any dish looking delicious once you strip it of its color?
There are two main ways to make the colors of your meals pop: neutral tones and contrasting colors. Using neutral tones for props and backgrounds will dull the surroundings of your main subject, thus directing less attention to them, and more to the dish itself. On the other hand, using contrasting colors between the dish and its surroundings creates vibrant dynamics that stimulate the viewer’s sight and draw them into the scene. The right choice for your images will depend on the characteristics and goals of each photo.
Thoughtful Styling
Once you’ve got the basics down, it’s time to have fun. Getting creative with props and styling can bring your images to the next level. It’s especially handy to have a few tricks up your sleeve for those particularly unappetizing dishes (think chunky soups, messy sandwiches, and the perpetually tricky sausage).
- Choose The Plate Wisely: Square and rectangular plates are typically harder to shoot than round ones—it’s easy for them to wind up looking trapezoidal and wonky, especially at eye level or shallow angles. It’s also easier to work with a salad-size plate rather than a full-size dinner plate since you won’t have to worry about filling up any unwanted space on the plate and the food itself will look more prominent.
- Add Dimension And Personality With Accessories: Napkins, utensils, glassware, and other placements can fill up the composition and make your images more engaging. Do make sure to think about color—taking a quick peek at a color wheel can give you a good sense of complementary colors (colors directly opposite each other on the wheel are pretty much guaranteed to look good together). As with dishes, avoid using so many accessories that you lose sight of the goal: The food should always be the star.
- Garnish The Dish: Is that chunky brown bowl of soup being uncooperative? Put an herb on it! No, but seriously, adding herbs, condiments, and toppings can be a great way to dress up a dish, even the ugliest ones. Again, think about what colors will enhance the dish, but make sure that your garnishes make sense. There’s nothing more jarring than an ingredient that doesn’t belong, no matter how pretty it might look.
- Hit Up A Thrift Store: If you plan to shoot lots of different cuisines, look for a variety of cutlery and dish styles. Rustic vintage stuff is trendy because it can look homey and timeless, but sometimes clean and crisp will do more justice to your food.
- Get Creative With Your Backgrounds: Maybe you’ve used that boring yellow cutting board one too many times and want to shake it up. Go pick up a piece of wood, stain or paint it to your liking, and voila! You’ve got yourself a new photo surface. Tablecloths, placemats, and slabs of stone are all also great alternatives to your kitchen table or countertop.
- Make sure your accessories are clean: Dirty spoons and used napkins aren’t a good look, at least not when they’re accidentally included. Double-check that you haven’t left anything in your background that you don’t want to feature.
- Interact with the food: If a shot of a dish on a plate just feels flat, consider having someone lift a fork- or spoonful out and focus on that—but make sure their fingers are clean and relatively well-manicured if included in the frame. Taking a bite out of a sandwich or scattering some crumbs in the foreground can also create a sense of activity that only makes the food seem more desirable.
Include A Human Element
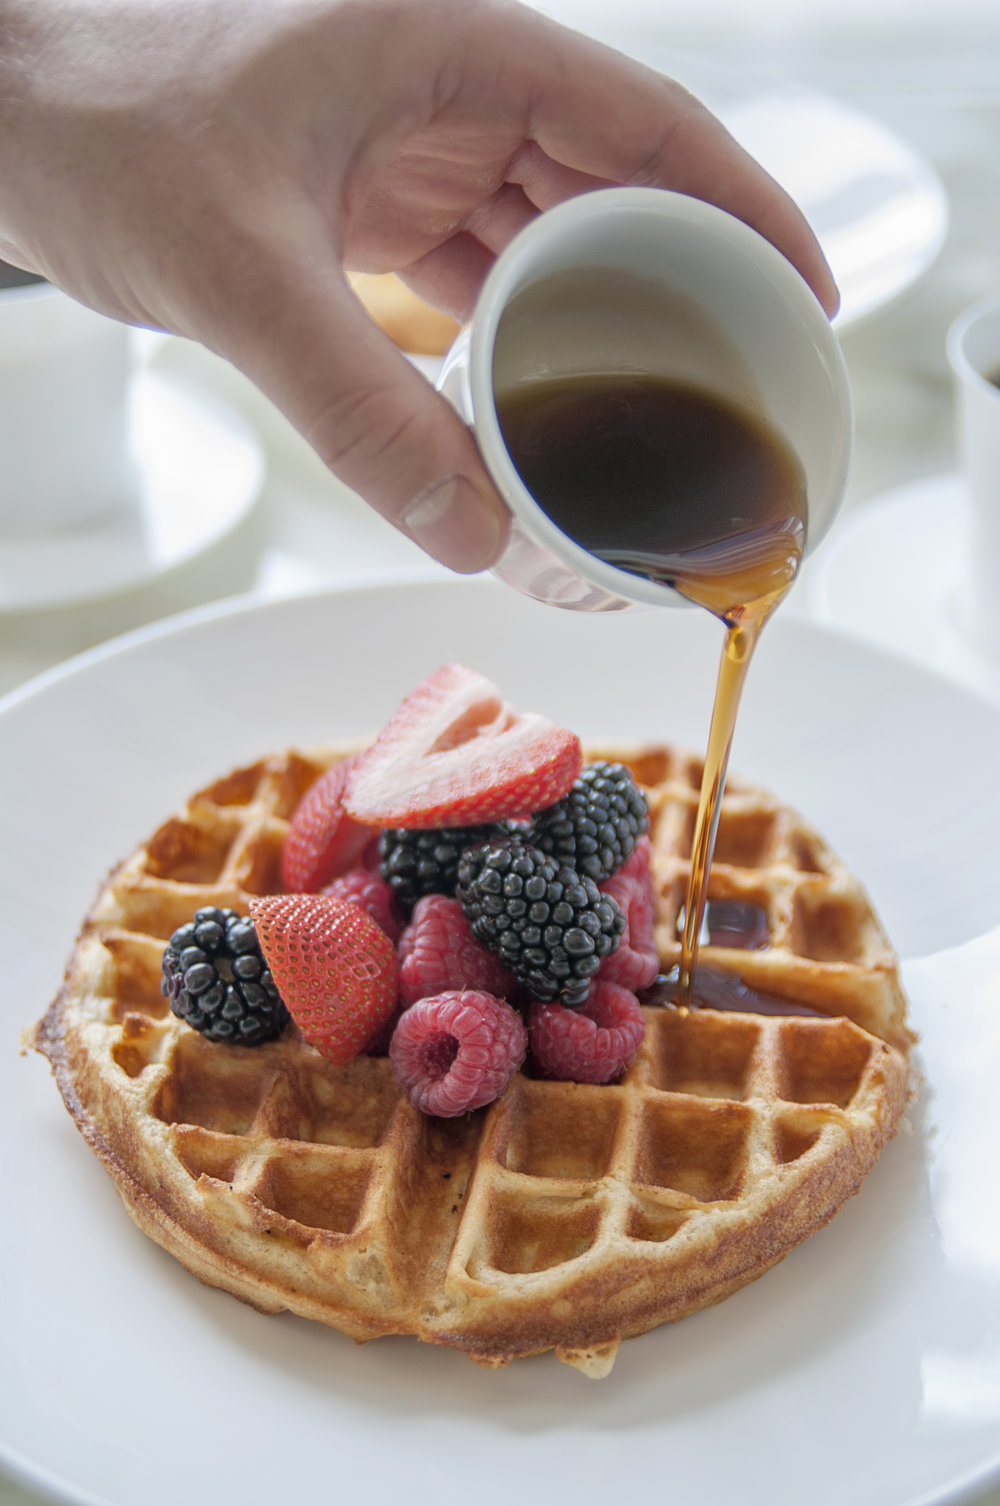
Speaking of viewers perceiving your images as if they were part of the scene, including people in the shot will give them someone to identify with. This can be anything from a chef cooking, a hand reaching out to the food, a family sitting together at the table, or a kid holding an ice cream cone.
By featuring a person, or at least part of them, in your composition, you’ll offer your audience a way to connect with the image. Including human elements can add depth, dynamism, and visual appeal to the photo, a practice that is also very common in landscape photography.
Strive For Minimalism

At the end of the day, the star of your food photography work should always be the food. While that might sound obvious now, it’s quite easy to get sidetracked once you’re actually shooting, and trying out new compositions and props. Keep in mind that all these elements are meant to support and elevate your main subject, rather than obscuring it.
Take a look at different fine art photography examples to see how most images use negative space to let the subject breathe and direct the viewers’ attention. Apply the same technique to your own compositions.
Photo Editing Software
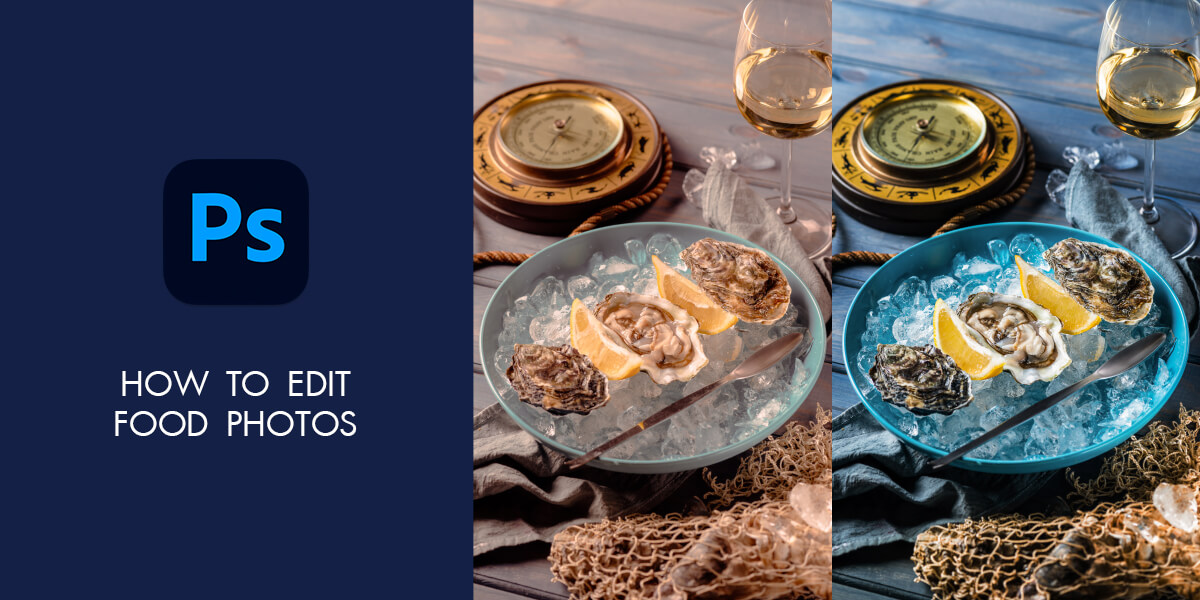
Post-production editing is the final touch that can elevate your food photographs to a professional level. While capturing an image is the first step, editing allows you to refine and enhance the shot, ensuring it meets your artistic vision and the intended use of the image. Editing can bring your photo to life. It’s your opportunity to reframe it and play with the exposure, contrast, highlights, and shadows. You can also remove imperfections and blemishes, sharpen details, and fine-tune the overall aesthetics of the image. Whether you use photo editing software -The Adobe Lightroom app is extremely user-friendly and a go-to for many food and non-food photographers or mobile apps like Snapseed, the key is to apply edits thoughtfully to maintain the natural beauty and appeal of the food. Here are the most common and useful techniques you can use:
- Adjust contrast, brightness, and saturation: The goal should be to make your images pop, but not look like they’ve been exposed to radioactive waste. If your camera supports RAW format and you have an image editor that can process it, use it! It makes adjusting things like color balance much, much easier and in many cases, will allow you to fix things that are virtually unfixable once you convert to JPEG or TIFF. Working from RAW is like working from a photographic negative while working off a JPEG is like trying to fix a photograph that’s already been processed by the local CVS. You just don’t have as much control.
- Fix white balance: Usually, this involves selecting the white balance tool, then clicking on a spot in your image that should be a neutral white or gray (napkins, menus, and shadows on plates work well for this). You can also manually adjust the color balance using the temperature and hue sliders.
- Adjust levels to brighten or darken your image: The goal should be to make sure that the lightest spots in your photo are pure white while the darkest areas are pure black, with the majority of the image staying in the center portion of the level curve. You should also aim to preserve any detail on both the light and dark ends of the spectrum.
- Adjust contrast, brightness, and saturation: The goal should be to make your images pop, but not look like they’ve been exposed to radioactive waste. If your camera supports RAW format and you have an image editor that can process it, use it! It makes adjusting things like color balance much, much easier and in many cases, will allow you to fix things that are virtually unfixable once you convert to JPEG or TIFF. Working from RAW is like working from a photographic negative while working off a JPEG is like trying to fix a photograph that’s already been processed by your local Kiosk. You just don’t have as much control.
Now that you’re armed with a toolkit of tips and tricks, go get snapping. And remember, like everything, it takes time to come up with the perfect shot. And it takes practice. In the same way that baking a cake takes practice, it will take a while until you achieve the stage where everything you shoot is a feast for the eyes. Creativity in photography knows no bounds, and food is meant to be enjoyed. With that in mind, don’t be afraid to think outside the box and infuse your personality into your photographs. Food photography offers an endless canvas for expressing your artistic vision, and by embracing your creativity, you can produce images that not only tantalize the taste buds but also inspire and captivate your viewers.
Thank you for coming to my blog and reading today’s post, I hope you all have a lovely day, even better, I hope you have a good week. Enjoy the sun, and take full advantage of it whilst it’s here! For now, though I shall say enjoy the rest of your day and I will see you all in two weeks 😃.


This is an outstanding presentation on photography. I have a DLSR camera but I use it mainly for when my wife and I play cribbage. We pretty much broke all the rules when filming how I made pizza.
LikeLiked by 2 people
Excellent presentation!!!
LikeLiked by 1 person
Excellent tips, thank you!!
LikeLiked by 2 people